Want to earn money online?
Then, Blogging is one of the best ways to do so.
Blogging has the power to change your lifestyle. But it is not as easy as it sounds.
In this article, I will share in-depth knowledge about Blogging in simple steps and how to start blogging from scratch.
With a very minimal investment, we can create a blog/website from scratch. I’ll share the cheapest way to make a blog that can handle a decent amount of traffic and gives you a better performance.
Excited?
Let’s get started!
Here are the simple steps to start your blog and earn money online from home.
#Step 1: Choose a “Niche/Topic” for your Blog
This is one of the most crucial steps while starting a blog.
It’s better to start a blog on a specific niche than a general blog (mixing many niches/topics).
Everything depends on a niche, so choose wisely, whether it’s traffic or earning.
You must choose a profitable market and have decent writing topics to earn money with your blog.
Now the point is “how to choose a niche for your blog.” Make a list of your interests, find the topic you like the most, and be easily writable.
Check out the affiliate possibilities, such as if you are in the beauty or health and fitness niche; you can sell thousands of products on your blog and earn a decent commission.
Here are some very profitable niches to get started:
- Weight Loss and Fitness
- Health
- Dating and Relationships Ideas
- Pets
- Self-Improvement
- Investment/Finance Ideas
- Make money online
- Beauty Tips
- Gadgets and Technology
#Step 2: Choose a Domain Name for your Blog
Your blog domain name plays a significant role in your online reputation.
It should be easy to remember and have at least one keyword related to your niche—for example, healthline.com (related to health), problogger.com (related to Blogging), etc.
Always go with Top-level domain names such as .com, .net, or .org. If these domain extensions are unavailable, go with ccTLD domains such as .co, .in, etc.
Note: You don’t have to purchase a domain because you’ll get a free environment with web hosting—more details in the next step.
Here are some most important things you must consider before buying a domain.
#1) Add at least one keyword: Try to use at least one keyword to your domain name. This will help visitors to understand your website and plays a significant role in search engine optimization.
#2) Always use Top Level Domain (TLD): Always use TLD domains such as .com. It is hard to get the desired name with a .com domain these days, but try to get the .com domain at first, then move to .net and then .org, and so on.
Domain with .com extensions has SEO benefits as well. If you target a specific country audience, such as India, go with .in; otherwise, .com is preferable.
#3) Do not use numbers and hyphens: Do not use any numbers and hyphens in your domain name.
#4) Keep it short: Make it under ten letters. Short names are easily rememberable.
#5) Buy an expired domain if possible: Try to research and find an expired domain name. Expired domains have a lot of benefits, such as backlinks, domain authority, etc
#Step 3: Choose a Web-Hosting for your Blog
A web host will store all your website files, such as images, blog posts, media files, etc. Anyone can access your website from your domain name.
So, your server (Web-hosting) should be powerful enough to handle your visitor’s requests. I recommend you go with Bluehost, as I also use the Bluehost web server on this blog.
Bluehost is one of the best-renowned web hosting companies. They have beene been in this business since 2003, and I loved theirs a lot.
You also get a 30-day money-back guarantee with your purchase, so no need to worry.
You’ll get a
- FREE Domain Name for 1st Year
- FREE SSL Certificate Included
- 1-Click WordPress Install, and
- 24/7 Support
Get 65% discount on Bluehost web hosting now!
If you plan to start only a single blog, go with their “Basic plan”; otherwise, go with their “Plus plan” to create more than one website.
Plus plan allows you to create unlimited websites. You don’t need to pay anything to start a new blog in the future if you choose a plus method.
Here is the step-by-step guide:
#1) Go to Bluehost by clicking the 65% discount button above.
#2) Click on “get started” and choose a “basic plan” or “plus plan.” Do not choose plus and pro plans if you are a beginner.
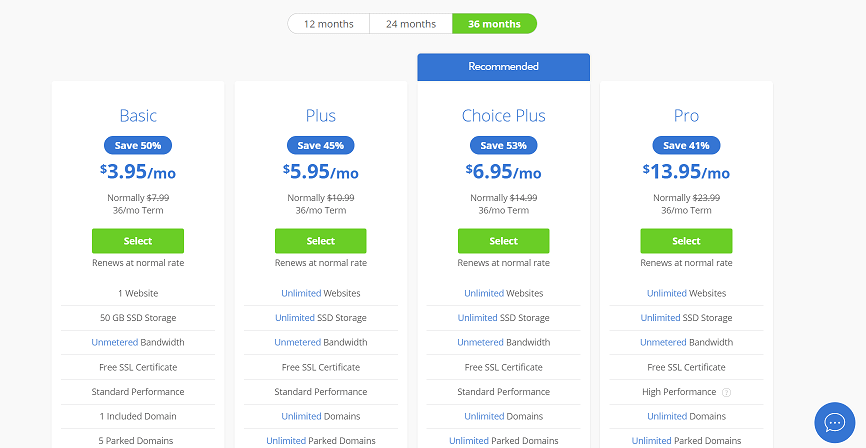
Note: If you are accessing India, You’ll get a 70% discount on the basic plan; it’ll cost you just Rs.199 a month.
#3) Set up your domain name.
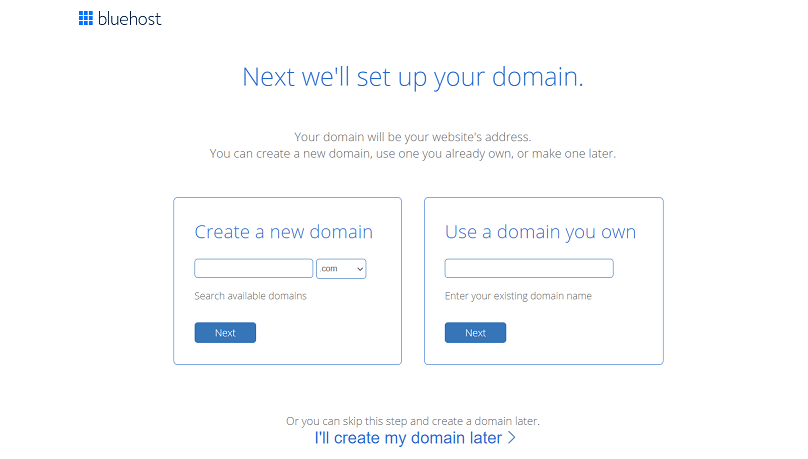
Enter your desired name in the “create a new domain” section, such as vineybhatia.com, and hit “next”
#4) create your account or sign up with a Google account.
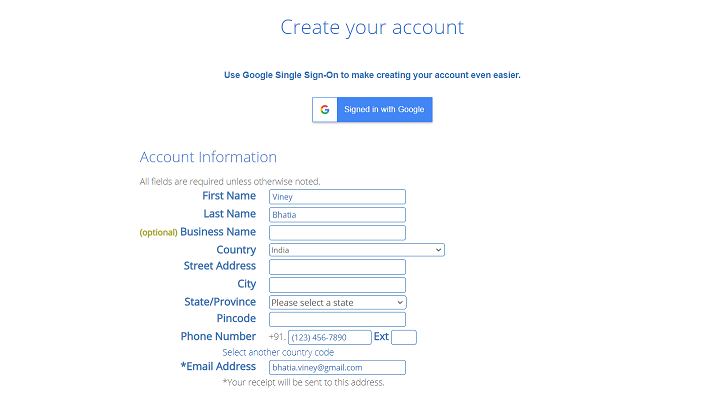
Fill out all the required information and create your account. Once done, choose your package information.
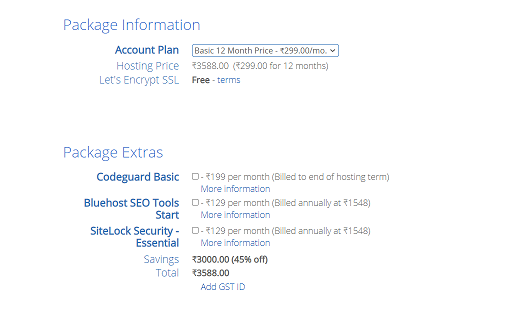
Uncheck all the package extras; as beginners, we don’t need such tools.
A 65% discount coupon is automatically applied to your purchase if you go to Bluehost using the below-mentioned discount button.
Click on “I have read and agree to Bluehost terms and conditions” and
Complete the payment process; Bluehost accepts almost every credit or debit card. If you are from India, you can pay using UPI as well.
Once payment is made, you’ll be redirected to create a password. Create your password, and we are done purchasing the domain and web hosting process.
You can also use your domain as your username.
Now we have a domain and web hosting to create our first WordPress blog.
Login to your Bluehost dashboard and follow the next step.
#Step 4: Setup WordPress
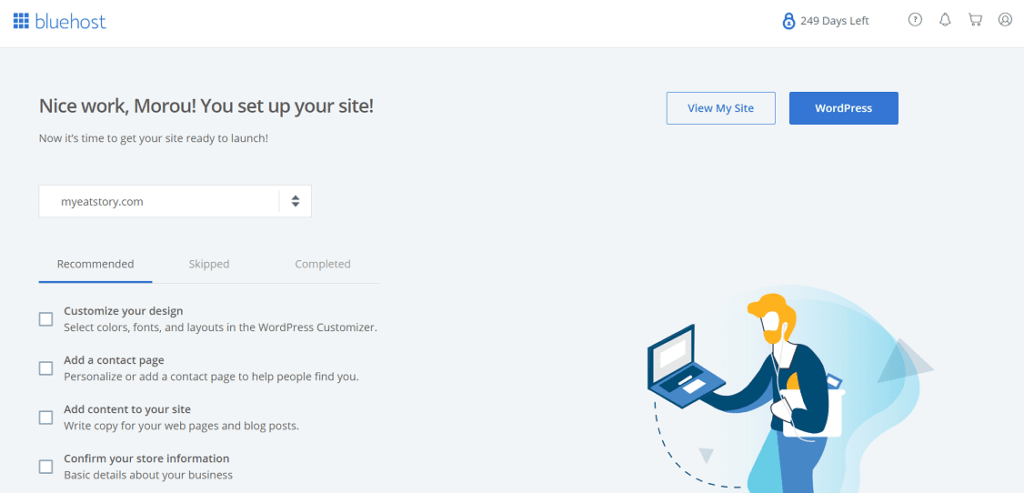
Your Bluehost dashboard will look like this.
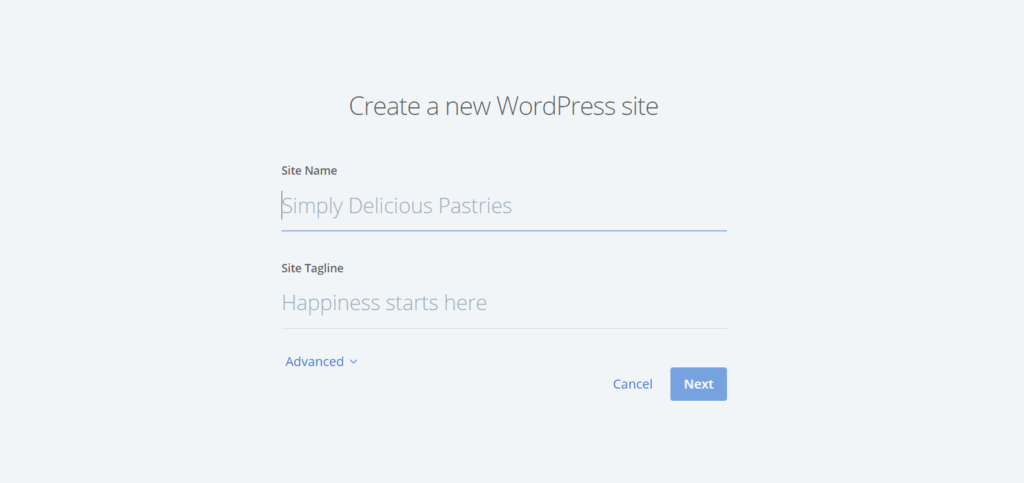
Click the WordPress button in the top right corner, enter your site name and tagline, and hit next.

Bluehost will take 1-2 minutes to install WordPress into your server. Once done, click on “My Sites” in the left sidebar.

On my site page, you’ll see a button called “Log in to WordPress.” This will redirect you to your blog’s WordPress dashboard, where the magic starts.
Your WordPress dashboard will look like this.

You can directly log in to your WordPress dashboard with a URL or use Bluehost’s website.
Your WordPress dashboard URL will look like this:
https://yourdomain.com/wp-admin
I recommend you watch this youtube video to get familiar with this dashboard. Here they explained everything about the WordPress dashboard in-depth for beginners. They have covered below things mentioned in this video.
- How to write your first blog post
- How to Create Pages
- How to create a menu in WordPress
- How to change or select a theme
- How to install plugins/theme
- How to create widgets
- and many more
#Step 5: Choose a Theme/Template
Thousands of WordPress themes are available under the appearance > themes section. I have tried and tested hundreds of WordPress themes and made a list of some best themes just for you.
Here are some of my best free and paid recommendations regarding WordPress themes or templates.
- Generate press (I am currently using it on this blog) (Paid)
- Newspaper X (Paid)
- Color Mag (Free)
- Neve (Free)
You can start your first blog with these websites. Once you are familiar with themes and other customizations, you can look around and test different styles and other things.
#Step 6: Essential Plugins for your Blog
Plugins are something like add-ons; you can add extra features to your WordPress website with the help of these plugins, such as breadcrumbs (if not included in your theme), social media buttons, backups, anti-spam comments, etc.
Before publishing your blog, I suggest you install some plugins for extra security and features. I have compiled a list of some must-have WordPress plugins for you.
#1) Akismet Anti-spam: This plugin must be on all your websites. This plugin blocks all spam comments.
You’ll face dozens of spam comments every day, including URLs. Deleting those comments manually is tough, so this plugin does that job for free.
#2) Social Share: This is also a must-have plugin for your blog. Users can easily share your content to their social media accounts with just one click.
Dozens of websites provide free social share buttons, and some are paid. Here is my list.
- Monarch (Paid)
- Social Snap (Paid)
- AddThis (Free)
#3) Backup: I advise you not to build your website without a backup plugin. Backing up your WordPress files every week is a must.
I lost some of my websites because I hadn’t backed up, and then I had to build everything from scratch after a little technical glitch.
You never know when a corrupt plugin or theme can turn down your WordPress website. So better to create a backup and save it in your local storage or cloud.
UpdraftPlus did this job well, and most features are free. I am currently using this plugin for all of my blogs.
#4) Cache: Creating a cache version of your blog in their browsers for repeated visitors is a must. You can go with
- WP Super cache
- W3 Total cache
- WP Rocket
#5) Wordfence Security: It’s essential to have a little bit of extra security to be on the safe side. WordPress is a pretty safe platform, but sometimes 3rd party themes and plugins can create troubles.
So this plugin blocks all the non-friendly activities on your blog for free.
#6) Contact Form: This plugin is also a must-have. You can create various forms with this plugin, such as contact us, surveys, etc
I am using this plugin to create a “contact us” form. You can have a look here.
#Step 7: Create a Sitemap and Submit it to Search Engines
This step is essential for a blog or website. With the help of a sitemap, you can submit your blog to various search engines so that they can index your blog to their search engine and get traffic.
Without this step, It’s impossible to get organic traffic. You have to notify search engines about your blog so that they can crawl your blog through your sitemap.
A sitemap is a blueprint of your blog.
I recommend you at least submit your blog’s sitemap to Google and Bing search engines; more than 95% of users use these search engines.
To submit a sitemap, we must first create our blog’s sitemap. There are various plugins to create a sitemap, but I recommend you use Google XML Sitemaps.
Download this plugin and activate it. Once activated, this plugin automatically creates a sitemap for your website. You can access your sitemap by accessing
https://yourdomain.com/sitemap.xml
Here is our sitemap – https://vineybhatia.com/sitemap.xml
Once done, you can submit your sitemap to the Google search console and Bing webmaster.
Within a week, you can search your website on search engines.
#Step 8: Write and Publish your first Blog post

Here is the WordPress editor. You have to write blog posts/articles here.
Here are some tips for writing a well-SEO-optimized essay.
- Stick to your topic (don’t just write nonrelevant things)
- Always use long-tail keywords such as don’t write for “dog food”; instead, use “best dog food in summers or winter.”
- Create a catchy title
- Try to post at least 1000+ words (tiny content is of no use these days)
- Use featured image
Once the writing is done, you can publish your content immediately or schedule it.
Write at least 15-20 articles before monetizing or promoting your blog.
#Step 9: Monetize your Blog
Here comes the primary step: setting up things to help you earn money from your blog.
There are dozens of methods to monetize your blog. We’ll go with the easiest and simple ways to monetize it.
My blog (vineybhatia.com) is monetized with Google Adsense Ads and some affiliate programs. Even these articles have affiliate links, such as Bluehost, Generate Press, etc.
I suggest you monetize your blog with PPC Ads (Pay per click ads).
This is one of the easiest ways to monetize a blog. To get the most out of PPC ads, it’s essential to monitor your campaigns constantly. That means regularly checking your dashboard and ensuring you get enough clicks or impressions for your ads. This is why PPC monitoring is essential to ensure success in monetizing a blog.
In my opinion, Google Adsense is the best ad network out there. You can get the maximum ads and maximum revenue from it.
You can sign up for Google Adsense Ads, and if your application is rejected or something like that, you can check out my Adsense tutorials.
Instead of Google Adsense, there are no different ways to earn from a blog. Here are some of the best monetization methods.
#1) Affiliate marketing: The most profitable method is making hundreds of dollars with just a few monthly sales.
All you have to do is recommend a product to your visitors, and boom, once anyone buys that product from your recommendation, you’ll get a huge commission.
Most products give their affiliate partner around 30-40% commission in every sale.
#2) Ad network: In this way, you don’t have to sell anything. Instead, you are selling space to ad networks to show their advertisements in that space.
Here, I am using AdSense ads for this blog. Google will automatically show ads to this spot per the visitor’s interest.
If anyone clicks on this ad, I’ll get some revenue. This is the easiest way to monetize a blog.
#3) Sponsor Posts: Once you have good traffic. You can post sponsored articles to your blog posts.
You can quickly charge between $50-250 for every post.
#4) Sell Contextual links: You can sell backlinks once your blog has a good domain authority.
You can charge as per your domain authority and niche. You can charge $50 per contextual link with a DA under 35 on average.
#5) Sell Digital products: You can sell digital products such as ebooks and courses or provide services through your blog and earn money.
#Step 10: Promote your Blog
The last and critical step is promotion. Without promotion, ranking or getting traffic to your blog is challenging.
There are many platforms to promote or showcase your blog articles and attract visitors.
#1) Quora: One of my favorite platforms to promote a blog. Over 1 Billion users are using Quora every month.
People ask questions then, and everyone has a right to answer those questions. Answer as many questions as possible and link your blog post link at the bottom of the answer with anchor text like “form more information visit” or “read more.”
If users find your answer informative, they’ll check out your blog.
#2) Reddit: If you are not on Reddit, you are making a big mistake. With a whopping 6 Billion visitors a month, Reddit is one of the best ways to promote your content.
Post snippets of your blog posts there, answer others’ questions, and link your articles for more information.
Do not just spam these platforms with your links, be relevant.
#3) Medium: With over 300+ Million visitors a month, the medium is another of my favorite platforms to promote a blog.
It’s tough to rank a blog post from our domain, but It’s super easy to type the same blog post using medium.com.
Once you write a blog post, try to write a summary (400-500 words), publish it on media, and link your original post’s link at the bottom for in-depth information.
#4) Social Media: It’s tough these days to get traffic from social media because they have imposed many restrictions on the content.
But if you have an audience on social media, you can easily share your blog posts and get traffic to your blog directly.
Youtube is still a relevant option to get some traffic, but you must create a video on that topic and link your article to it. So that people can come to your blog for more relevant content.
FAQ
Here are some frequently asked questions related to Blogging.
Q.1) Can I seriously earn money through Blogging?
Ans. Yes, Blogging is the best way to make money online, passively. But it’s not as easy as it sounds. You have to learn a lot and do the hard work with consistency.
Q.2) How much does starting a blog from scratch cost?
Ans. Between $3 to $6 is the cost to run a blog every month for a beginner with minimum resources. But the problem is you have to pay annually to get started.
Final Thoughts
You can easily make a professional blog with these ten simple steps. If you still have any questions, feel free to ask me.
And If you like this in-depth tutorial on How to start/create a blog in India with minimal investment, share it on your social media account.
